Candy Crush

Happy Weekend, All!

It is a gorgeous, cloudless day here on the beach, much like the afternoon when the idea for this card sprung to life!

A few week’s ago, my partner and I were walking along the water and spotted a collection of candy necklaces just hanging from a post.  How odd, and wasteful, (I still love candy necklaces!) that someone would have left five uneaten strands there!  Then my partner said, “You should make a card like that.” I started thinking about how I would execute it, but I only had time to think until today.

Candy necklace.
Candy Necklaces were invented in 1958; click the image for an article on vintage candy favorites that are still around today!


Now before I get to the actual card, I must relay a bit of synchronicity. I played along with Fusion last week, and Kimberly told me that I would really love this week’s challenge.  Sure enough, she was right, as it aligned perfectly with my candy necklace idea!!

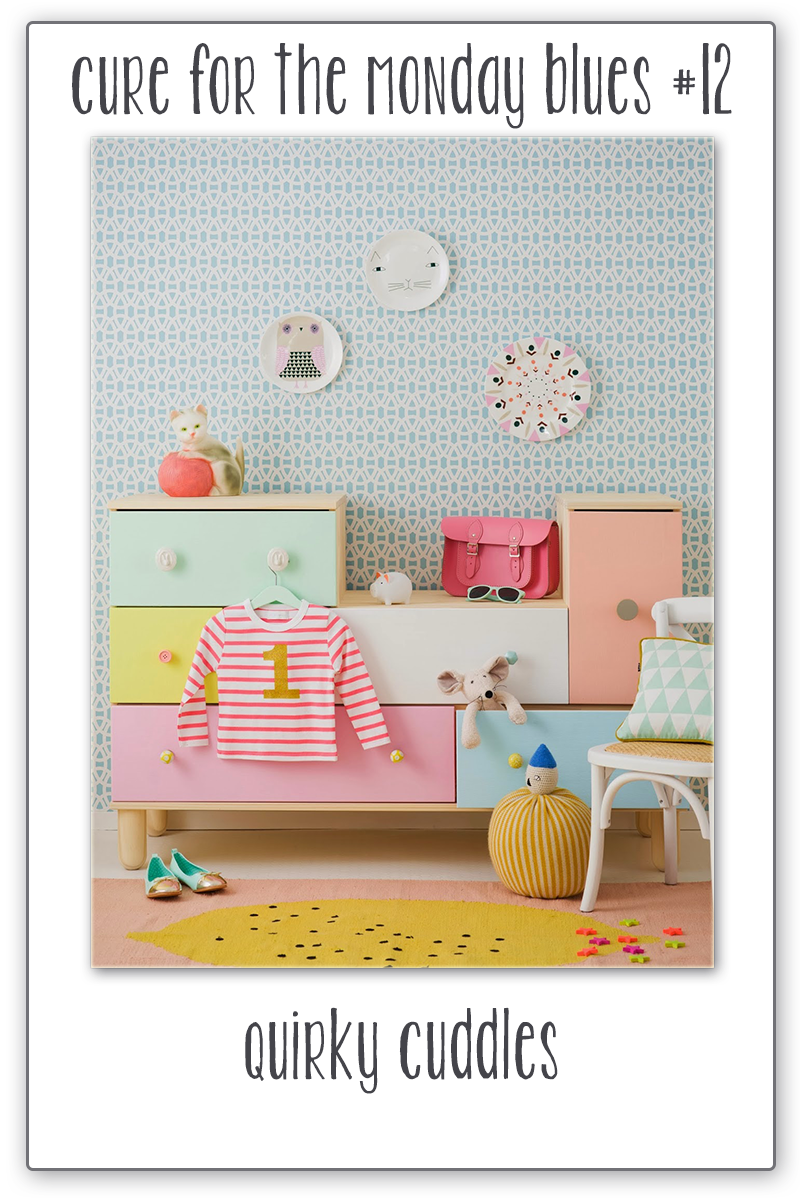
So today I was able to finally fuse together that moment on the beach and the inspiration below!  I was also thinking about the colors in Taheerah’s Cure for the Monday Blues challenge photo–for which I have another card slated, but potentially won’t finish in time…additionally, her photo conveys the soft, sweet dreaminess of childhood so it connects perfectly to one of my favorite candies from youth!

So here is this week’s Fusion image:

And Taheerah’s image:

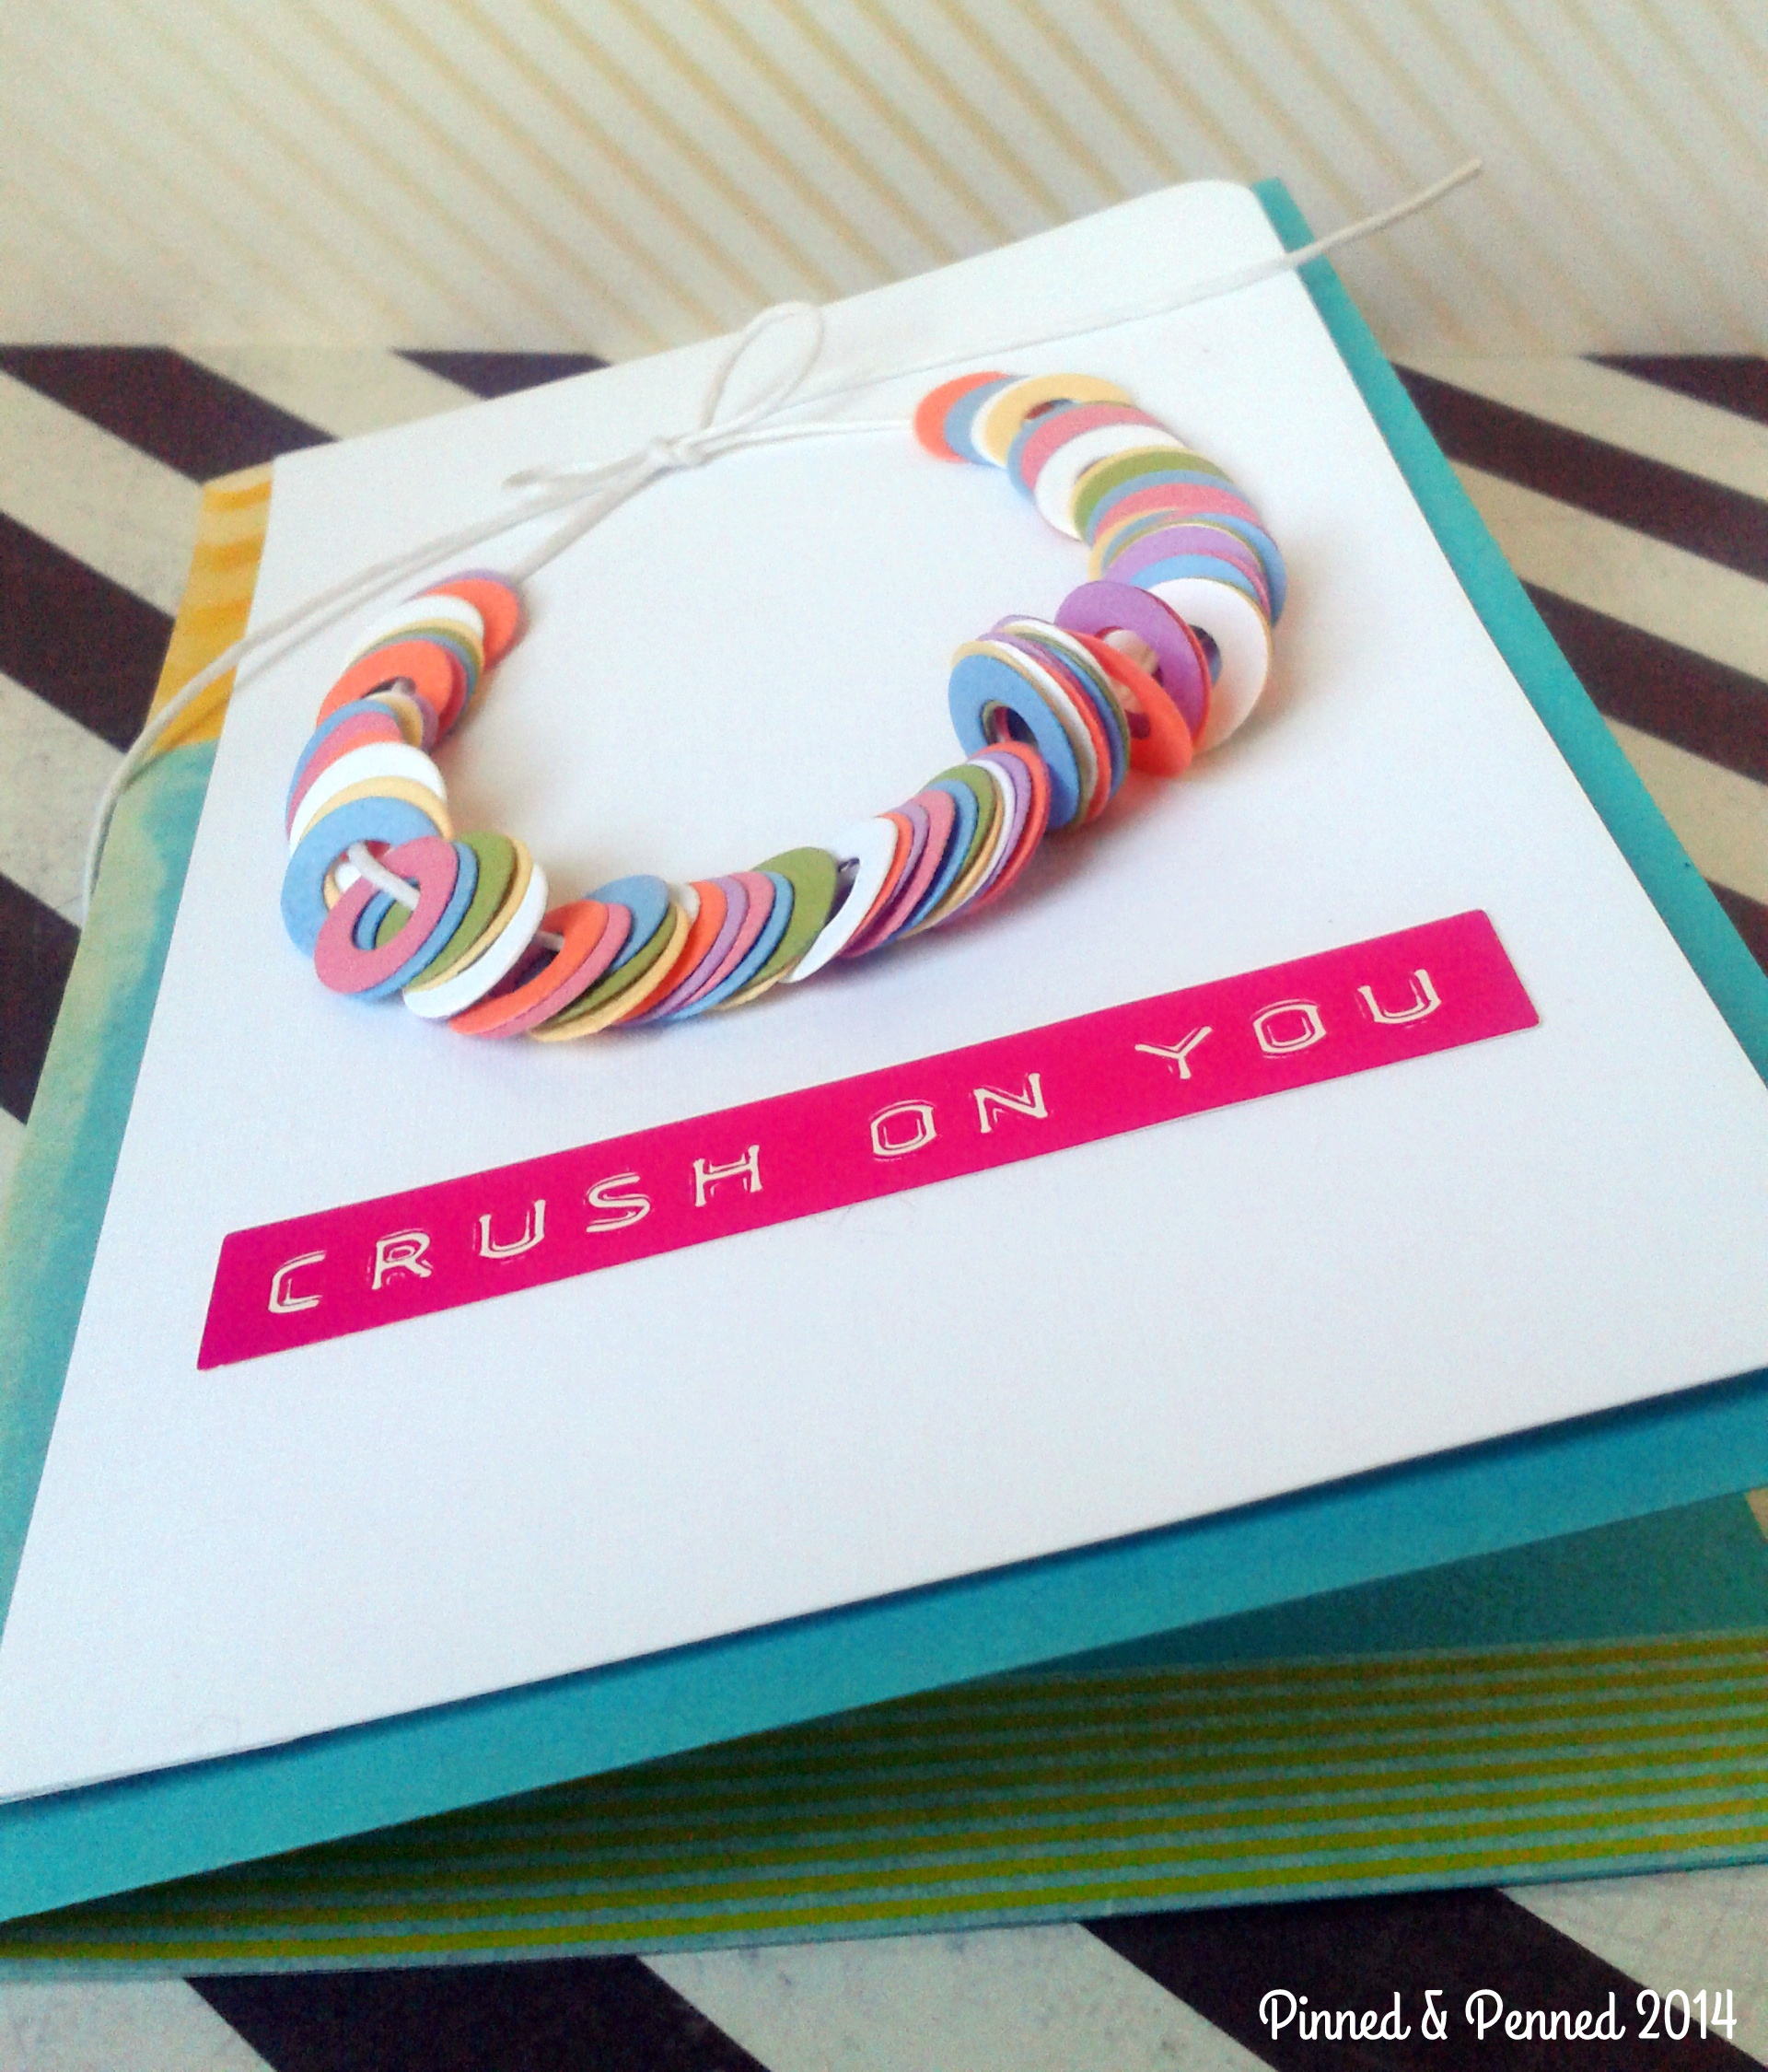
And here is my sweet card:

2014-04-12 14.36.44

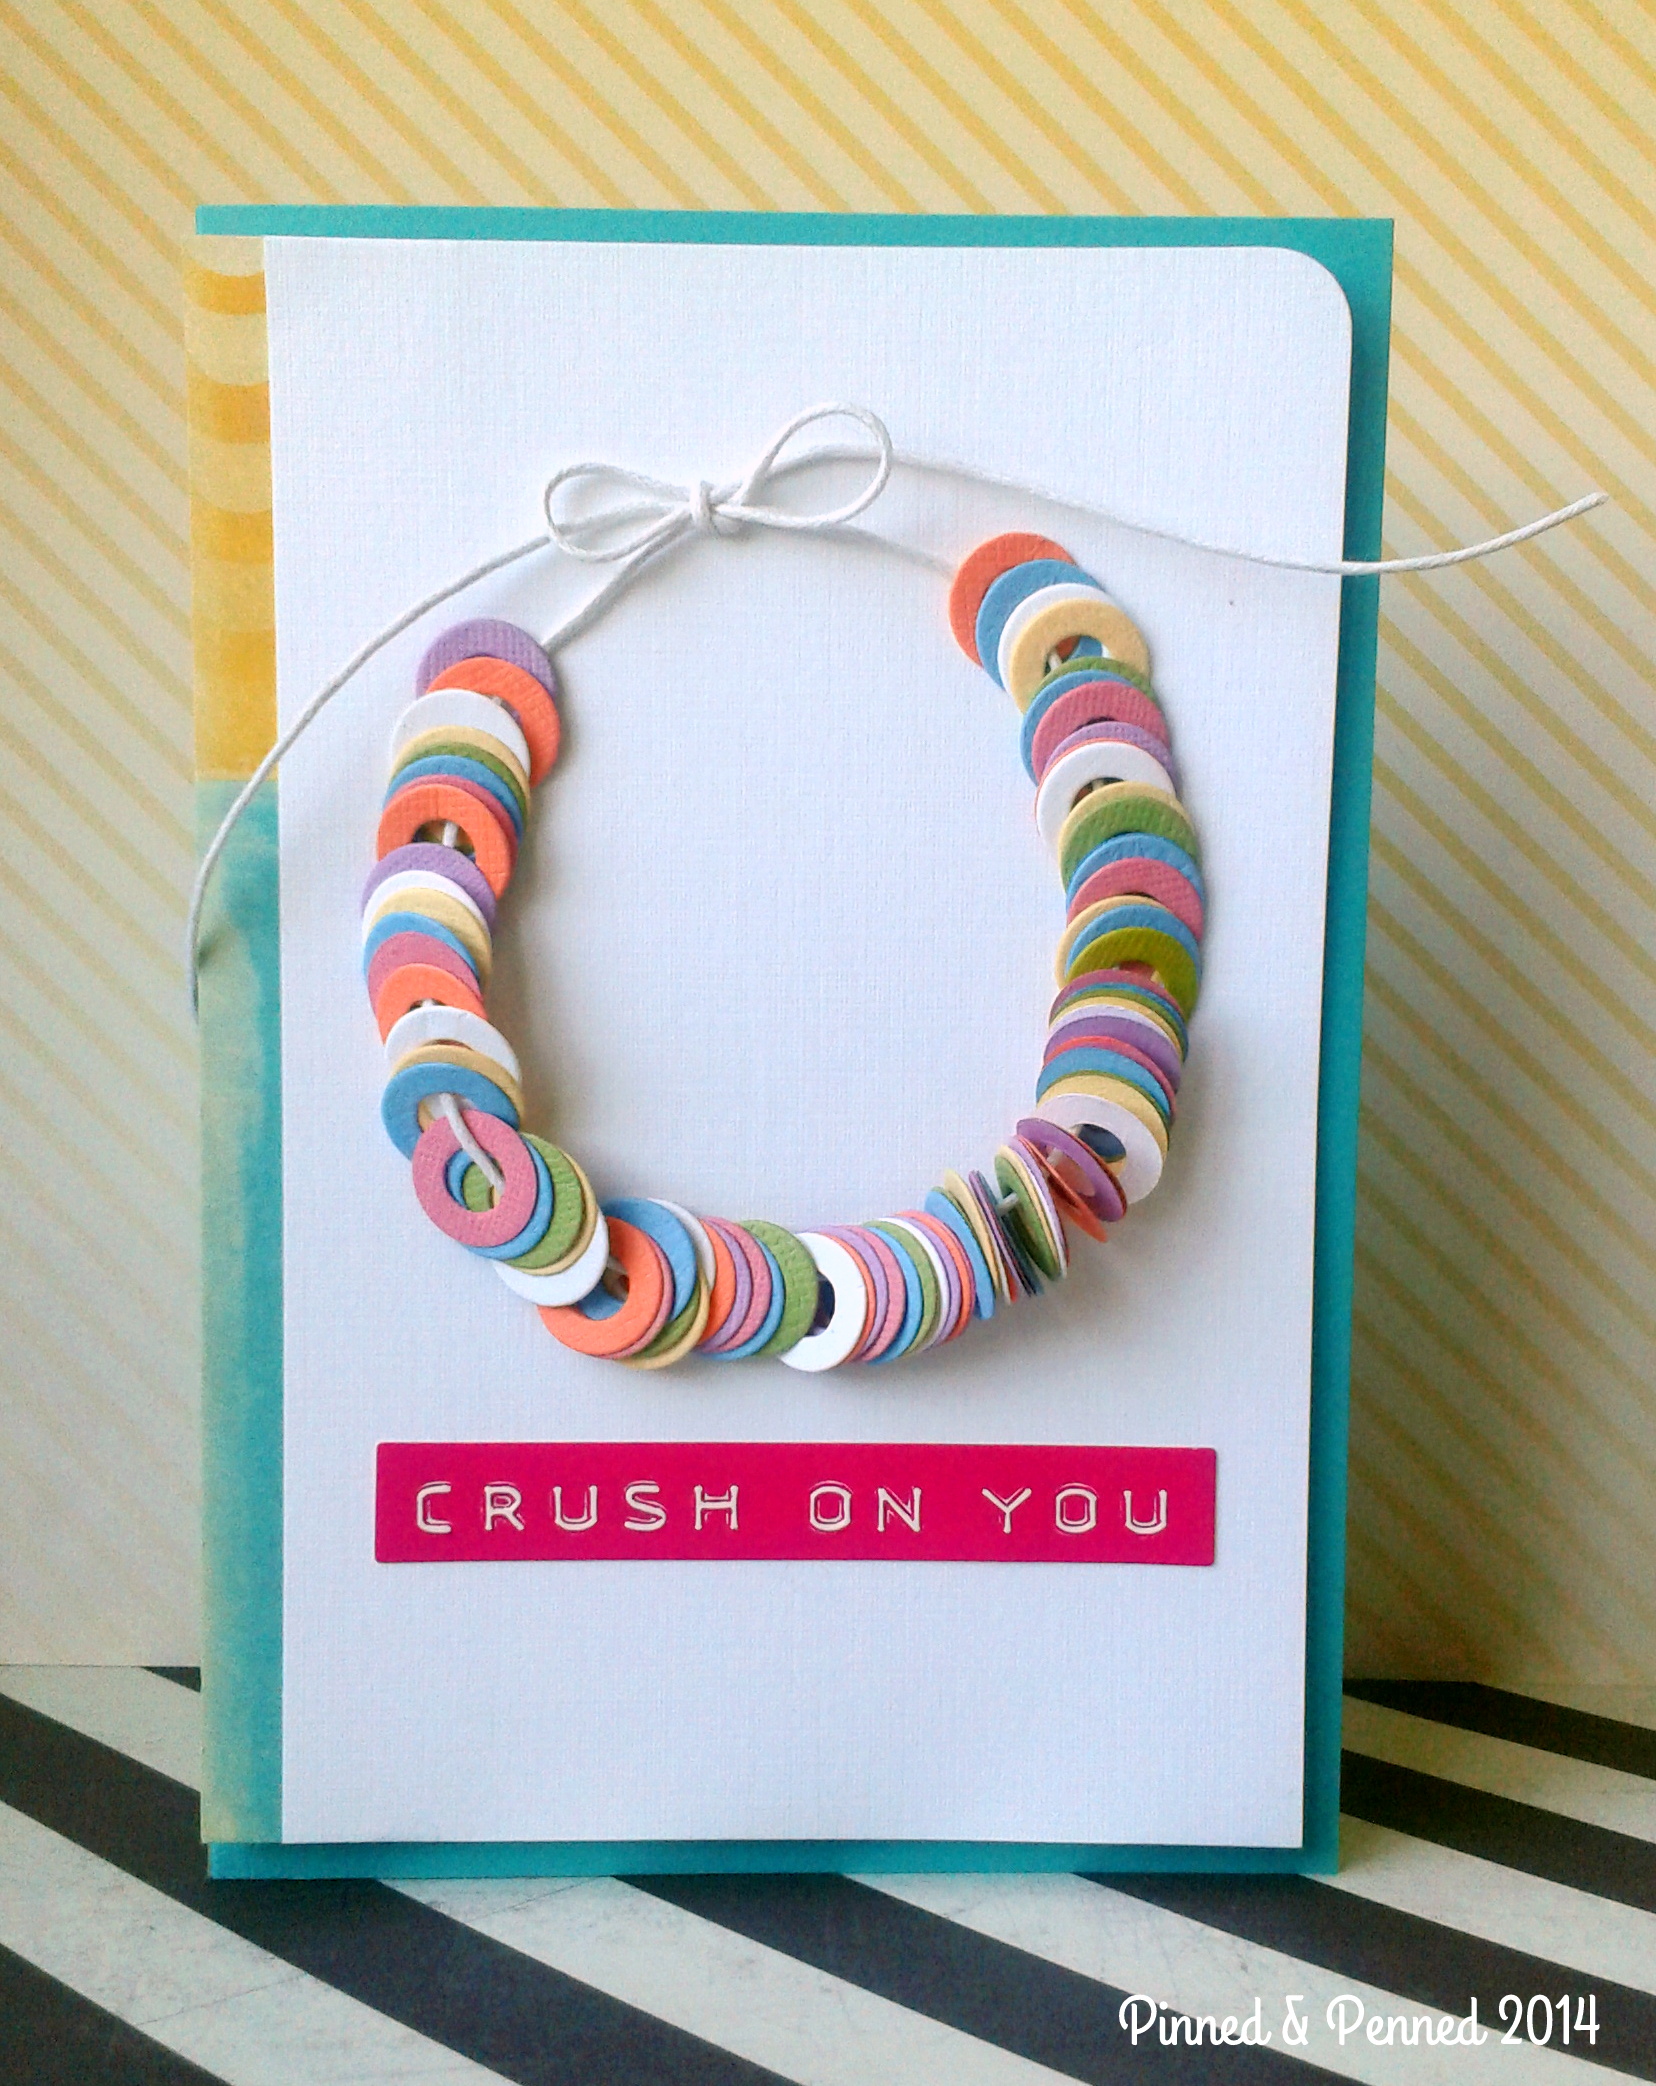
Before I saw the photo, I knew I wanted to stay pretty faithful to the powdery soft colors of the original candy necklace, so they just happened to align perfectly with the softness of the pastel rose garland.  I decided not to fill the whole necklace with “candy” and left a bow at the top for interest; it also echoes the bow within the garland.

I pulled the blue tablecloths in the photo into my side panel, a scrap paper from a discount pack.  Initially, I thought I would use the white linen for both the card body and front panel; but decided to go with the turquoise.  It was only when I turned the Bazzill paper over to cut it did I notice that the color of the paper is… Candy Necklace!!  Another fusion!!  I had to read it twice to believe my eyes.  This paper is so delicious in terms of weight and color, I don’t even think you can get the full impact from my photos.  It’s from Bazzill’s “Green with Envy” set of papers.

2014-04-12 14.39.26

2014-04-12 14.40.24

PROCESS:

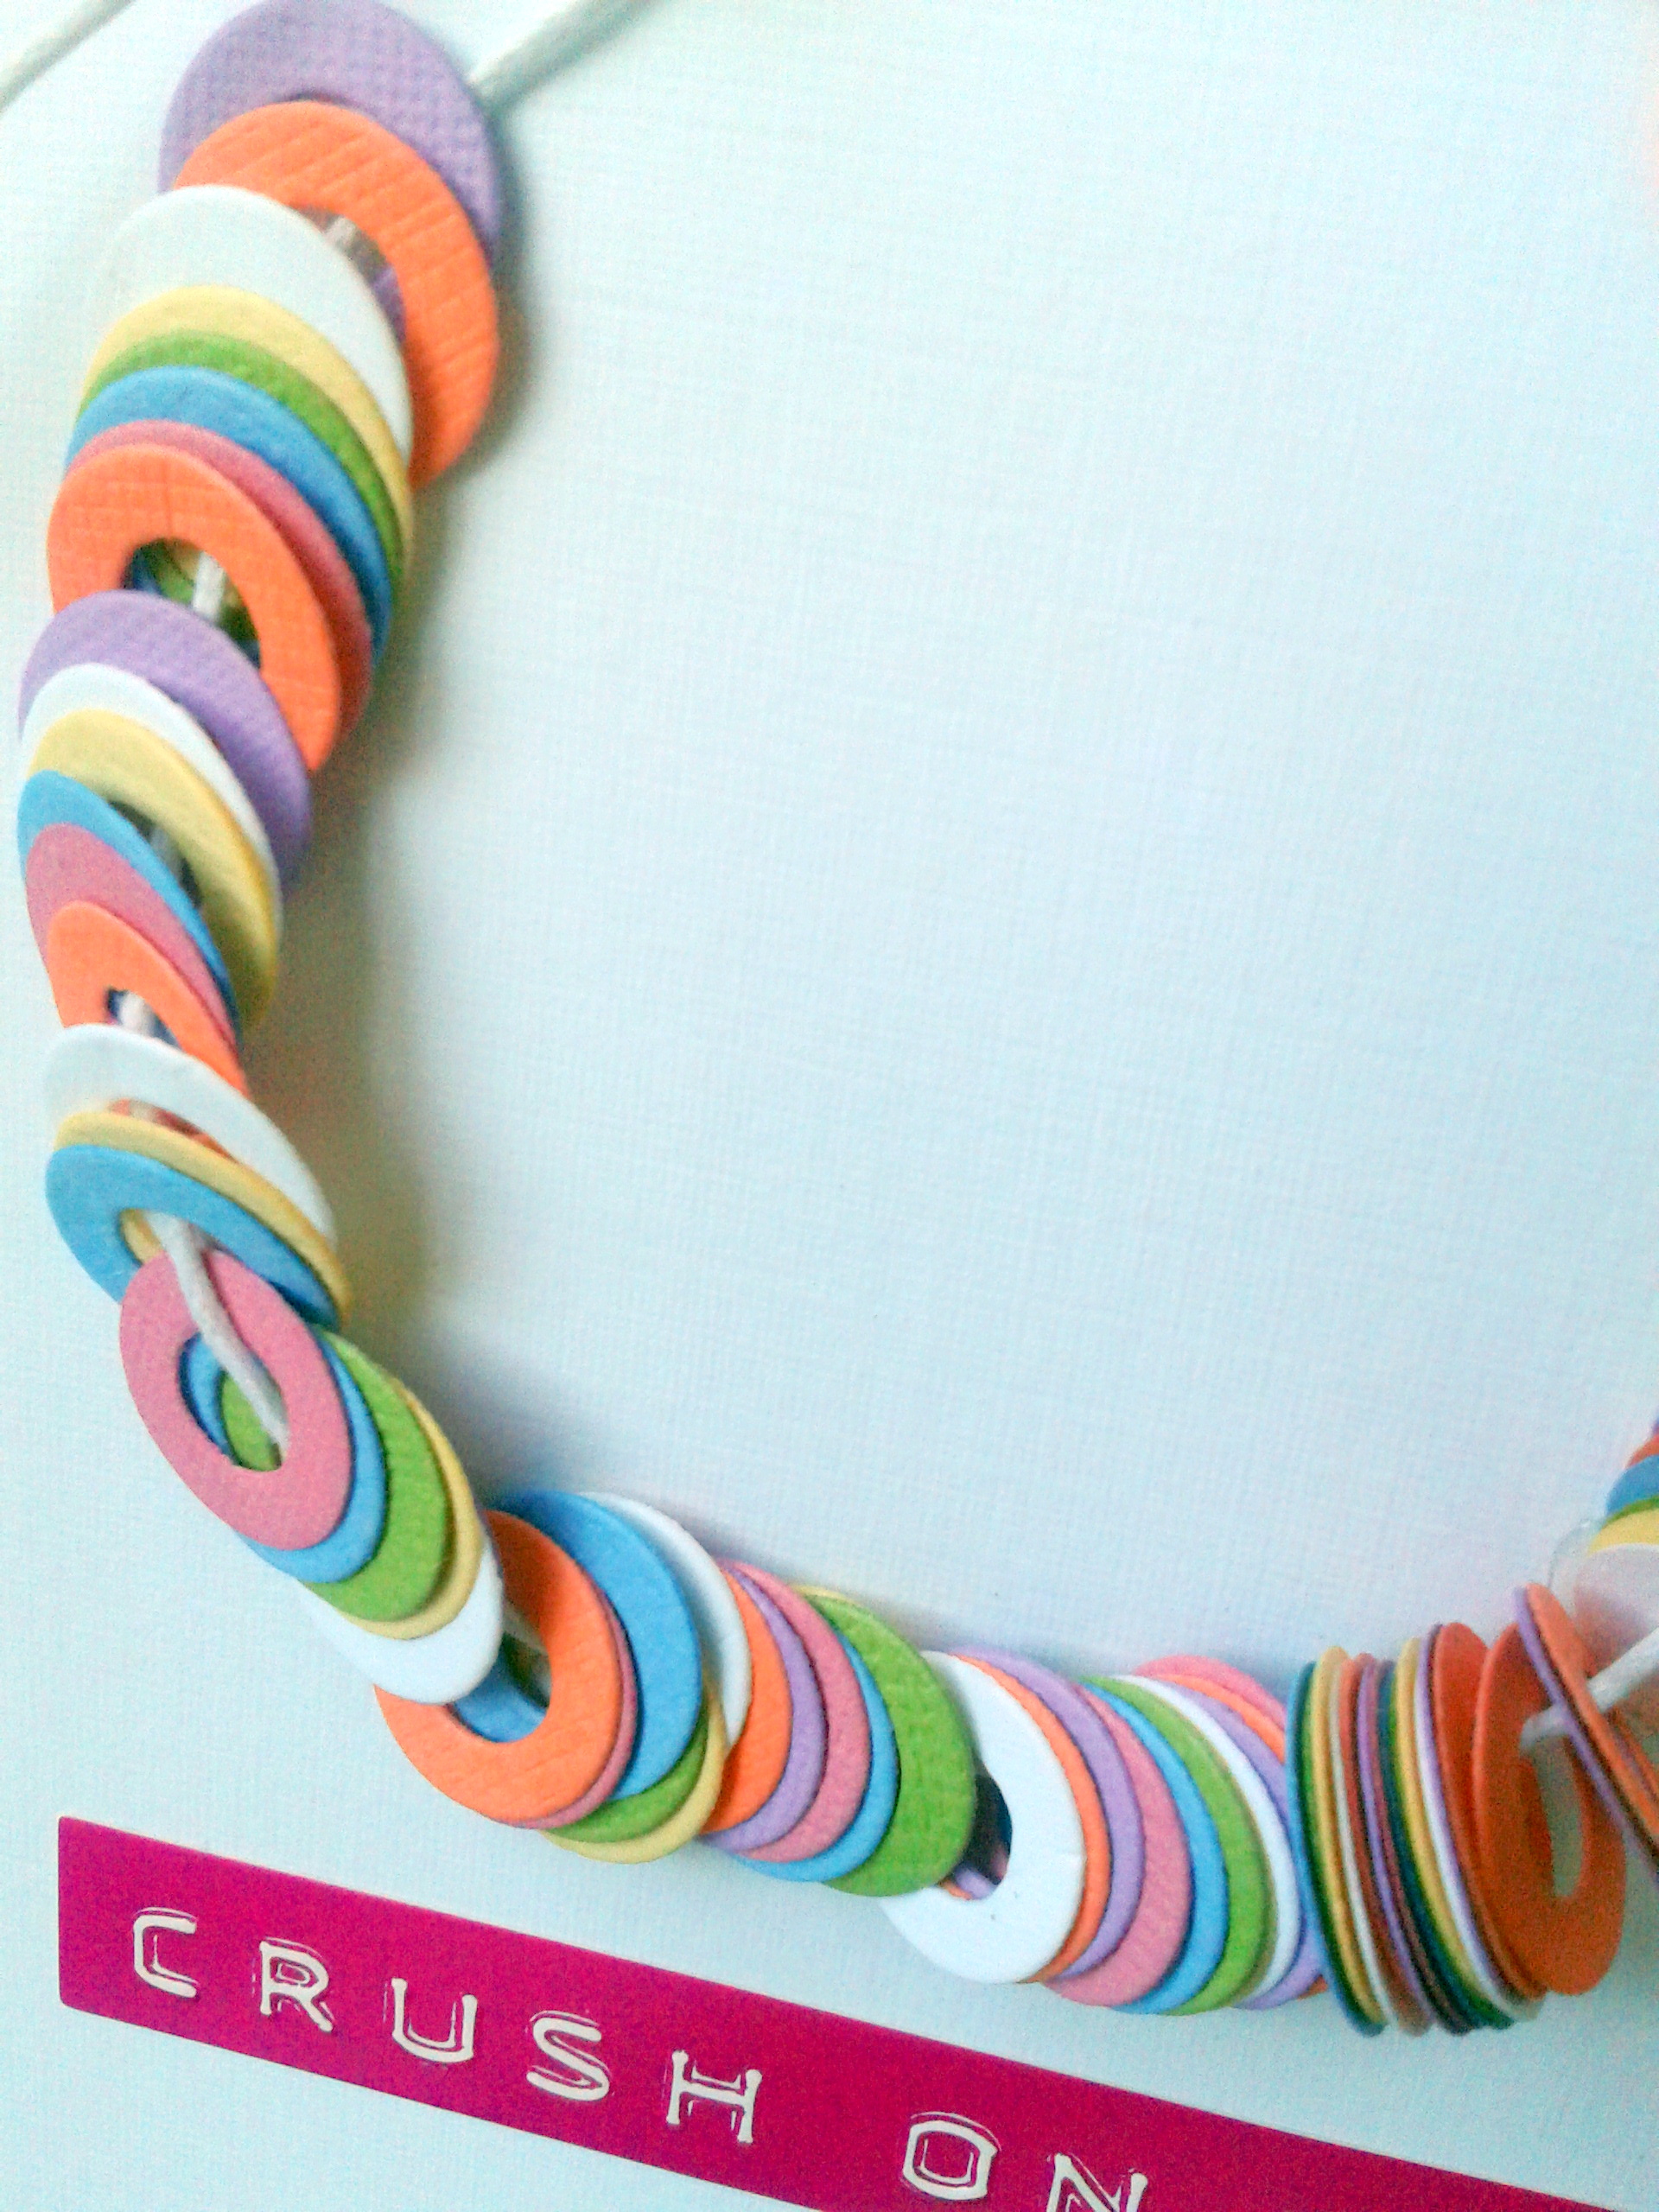
Okay, so how did I execute my little “candies” and their placement?  I immediately thought of Avery Elle’s Simply Tags set when I saw the real necklaces.  The little circle die was a perfect, if not tedious, choice!  I cut 12-15 of each color.  And I only have one of those little circles…

At any rate, once I had finally finished die cutting, I got to thinking about how I would be able to adhere the necklace while giving it dimension and interest, but making sure it stayed on the card and the adhesive would not be seen!!

I used a combination of Mod-Podge and Scotch ultra-thin glue dots.  The glue dots anchored certain parts, while I was able to manipulate other areas easily using the Mod-Podge.

I wanted some of the pieces to move, so I anchored those on either end of the loose ones.  In the photo below you can see the texture of the papers I used, and the standing pieces are moveable.

2014-04-12 15.02.35 (1)

2014-04-12 14.38.11

The back and inside are finished off with yellow washi– I love how the striped back of the front panel peeks through just a little!

2014-04-12 14.37.07

Last but not least, I needed a sentiment.  I had planned to stamp a bold black “sweet” on the front originally, then my eye wandered over to the American Crafts Valentine Phrase Stickers I had bought waaaaay back in February at Target for some valentines that never materialized.  Another moment in this process where stars aligned.  And a card was born!

To be honest, I am crushing pretty hard on this card!  What about you?

You have until the 22nd to play along with the challenge at Fusion, and only hours until Taheerah’s challenge runs out.  But don’t worry– she’ll be back with more on Monday!

Since Simon’s Challenge this week is all about sweets, I am going to send this card right over there as well!  A triple-header!

Simon Wednesday Challenge Blog

Wishing you crafty time full of flow and sweet serendipity this weekend!

I am off to catch what is left of the sun!


More Sweetness!

Lawn Fawn CHA 2014 Catalogue Challenge!

Here are my next two creations for the catalogue!

First up, Sweet Swinging Gingerbread Kids!

IMG_20131209_112142

I wanted to create something with the gingerbreads, house, and candies from the Sweet Christmas set, but setting a scene wasn’t really coming together.  I am not really sure how this card came about–it was one of those that seemed to make itself!

IMG_20131209_112234

I stamped eight gingerbread kids on Gina K. heavy weight kraft paper with Unicorn White ink, then embossed with fine white powder.  Next, I adhered them, back-to-back, running the baker’s twine through them.  I stamped the house and sweet embellishments with Versamark Dazzle, covered with sticky embossing powder and then Stampendous white glitter.  I really loved the CAS nature of the front!

IMG_20131209_112205

The inside came about as a complete surprise.  I had hand-cut a similar banner for another card, and wanted a bit of an interesting inside, since the front was so simple.  So I echoed the kraft color on the front, stamped and embossed the sentiment, and adhered with white, glittery brads.  What I didn’t realize, though, was that the Ghiridhelli chocolate would fit perfectly inside the banner!  Talk about sweet!!

To cover up the backs of the brads, I ran some washi tape over the middle of the card’s back.

IMG_20131209_112257

Last up, Critters in Holiday Squares!

IMG_20131209_112613

So, this was actually the first card I made for the challenge, and it took the longest.  I had been thinking about the concept for awhile, inspired by the Brady Bunch and Hollywood Squares!  I wanted to feature the little critters in their own frames, but have them looking at and talking to each other, using the sentiments from the Critters in the Snow set.

My initial visualization didn’t quite manifest for this card, as I was also trying to complete this for the CASE Study challenge, based on Keisha’s sketch:

I didn’t make it in time to play along with them at CASE Study, but this card finally came together!

IMG_20131209_112409

So how did it all happen?  Well, I first measured and die cut the circles on a 4.5 x 4.5″ card.  Then I stamped and Copic-colored the critters first, and fussy cut them.  You can see that I embellished Rudolph a bit, with a Glossy Accents nose and glittery-embossed antlers.

My original intention was to have them stamped right on the backing paper, with only the penguin popping out of his frame, but that version wasn’t satisfying me.  I had placed some fabulous turquoise snowflake paper behind the critters and loved the effect, but we couldn’t use any patterned paper!  What was I to do?

Well, I cut a square backing paper, sponged turquoise pigment ink from Cat’s Eye over it, and then stamped the snow flakes from the Critters set in Unicorn White and heat embossed with white powder.  Voila, problem solved!

IMG_20131209_112430

I embossed the polka dot paper and tag, assembled everything and then added the embellishments!

Here are some close-up shots of the critters!

IMG_20131209_112453

IMG_20131209_112504

And the back of the card:
IMG_20131209_112539

Well, that is it for me!  These were all little labors of love, but now I need to get down to brass tacks as it is Monday and time to get ready to teach my little human critters!

Head over to the CHA Challenge for all sorts of fun!  And please contact me with questions or comments!  I love connecting with you!

A Sweet Christmas

Lawn Fawn CHA 2014 Catalogue Challenge!

I have been working hard over the last week on my entries for the challenge, and am finally able to reveal them, just in the nick of time!  I have two posts today to cover my four entries.

First up, Snow Bunny and the Gumdrop Candy Mountain!

IMG_20131209_113152

Everyone knows this little cutie, Winter Bunny!!  He’s back for a whole new sledding experience!  I colored him (many times over to get all the shading just right) with Copics and added a cottontail with white Flower Soft!

IMG_20131209_112956

Delicious and so sweet, isn’t it?  I stamped every gumdrop and orange slice from Sweet Christmas, masking as I went.  Then I colored each piece with Copics.

IMG_20131209_113252

I then covered the whole bunch with Versamark Dazzle, sticky embossing powder, and Stampendous glitter!  This technique I used for my Holiday Bags, which you can see here.

IMG_20131209_113041

For the sentiment, I combined two of the stamp sets, Critters in the Snow and Sweet Christmas.

IMG_20131209_113243

Next up, Peppermint Candy Mountain!

IMG_20131209_112651

I used the same technique for this card, stamping all the candies from the Sweet Christmas set, masking as I went.

IMG_20131209_112806

Then I colored with Copics, covered with Versamark Dazzle and clear embossing powder to get the nice sheen.

For the post, also from Sweet Christmas, I needed something a big longer, so I used stamped it once, then lined up another atop the first.  I colored it with Copics and Uniball gel white pen, then used the same technique as with the peppermints.  I fussy cut the mountain and the post.

The flags were die cut and stamped with sentiments from Sweet Christmas.

For the background, I covered a whole card with Versamark Dazzle, sticky embossing powder and Stampendous white glitter.

Every thing was adhered with foam dots, except the pole.  I wanted the flags to pop just a bit at the ends.

IMG_20131209_112719

I just love the effect of the background; it’s like a bed of freshly-fallen sparkling snow, which I used to love crunching through when I lived in New York!

Head over to see the sweet creations from all the Lawn Fawn challenge participants!

I hope you are having a dazzling holiday season, with mountains of  sweet memories, wherever you may be!

Holiday Gift Bags

Make-It Monday # 142 Decorated Kraft Bags

Happy December, all! I am excited to share the kraft gift bags I made for the Papertrey Ink challenge this week.  This was a really inspiring challenge as the possibilities are endless and playing around with ideas on little kraft bags is a great way to experiment, since the bags are so inexpensive.  Once I got started, I could barely stop!

I am going to start with my favorites and explain my process, as I discovered a really cool technique somewhat by accident!

First up, Twinkle.

IMG_20131201_122252

As you can see, I used the light bulbs from Papertrey Ink’s Come All Ye Faithful additions set.  I just love these and want to use them all the time!  Labor intensive, but worth it!

So I first sponged Unicorn White ink onto the Crafter’s Workshop birch trees stencil.  Then heat set.  Next I stamped all the lights, and heat set again.  Then I had a bright idea 🙂 I had earlier experimented with stamping Versamark Dazzle directly on my embossing, covered with clear embossing powder and heat set.  You can see these cards here.  I wanted to create a sparkly winter forest, so I covered the bag with Versamark Dazzle in Champagne; then added Ranger Sticky embossing powder, heat set and sprinkled with white glitter.  Ta-da!

IMG_20131201_122335

The effect reminds me of sugar-coated gumdrops and I was thrilled.  I will be using this technique on cards and tags this season for sure!  I finished it off with a sentiment stamped in blue Brilliance Ink from Amuse Studio’s Hello December set, which I will feature in my next post!

Next up, Candy Jar!

IMG_20131201_122046

Here I have used Papertrey Ink’s fabulous Tag Sale #8 die as the focal point.  Inside, I have placed my little mason jar from Poppystamps, and filled it with candies from Lawn Fawn’s Sweet Christmas set.  The bag’s background was stamped with the Versamark Dazzle and then covered with Bridal embossing powder, which I love and have had forever, from Personal Stamp Exchange.

IMG_20131201_122105

For all the candies, I masked and stamped each one with Tuxedo Black ink so they would overlap.  Then I colored with Copics.  I heat set and then covered with Versamark Dazzle and clear embossing powder and heat set for a glossy sheen which you can see in the first  and last photo.  Pretty sweet, don’t you think?

IMG_20131201_122127

IMG_20131201_122140

Bag #3: Delicate Doily Snowflake

IMG_20131201_122823

This bag was stenciled with Crafter’s Workshop doily in Unicorn White and covered with bridal embossing powder.  The little button says “sweet” and I thought it was a perfect embellishment for the tag.  I love Papertrey Ink’s font for the “joy” sentiment, which is from the Mega Mixed Messages set.  The green ribbon is covered with doily images that reflect the bag, and instead of using traditional red and white, I opted for juicy, bright pastels.  It doesn’t quite represent here, but I used Brilliance Ink in red-gold, which is very iridescent and matches the pink sparkly ribbon.

IMG_20131201_122835

Bag #4: More Joy

IMG_20131201_122646

I embossed a few of my kraft bags which really added to the basic brown bag.  After embossing, I again covered with Versamark Dazzle, then covered with bridal embossing powder for this shimmery, iridescent quality.

IMG_20131201_122659

I used Papertrey Ink’s Boutique Borders die and their Joy sentiment again.  I hand cut some flags from my snowy-white sparkle paper and adhered with silver sparkle brads.

Bag #5: Rustic Winter Wreath

IMG_20131201_123053

I just LOVE this delicate wreath stamp from Memory Box.  It is so versatile and can be used for any season.  For this bag, I again embossed it with Tim Holtz’s wood-grain embossing folder.  Then I stamped the image with Unicorn White, and embossed with detail white powder from Stampendous.  Here you can see the embossing folder detail and glossing effect of the wreath.

IMG_20131201_123127

Instead of using Papertrey Ink’s Fillable Frames #4 die as a label, I folded it and used as a closure!  Way to re-purpose!  I love seeing products in a new light.

IMG_20131201_123113

The sentiment is from Waltzingmouse Stamps Halloween Party set.

Whew!  Are you ready for just 2 more?  Okay, here they are!

Bag #6: Fa-La-La-La-La!

IMG_20131201_122511

Here I featured Papertrey Ink’s Come All Ye Faithful Additions Set and keeping with the musical theme, added some die-cut  silver bells from Memory Box.

Bag #7: Sweet Swag!

IMG_20131201_123016

Last, but not, least (though it is my least favorite of the bunch), is my sweet swag bag, featuring Paper Trey Ink’s Come All Ye Faithful Additions sentiment.  I used the Memento Brilliance inks for iridescent shine. Ribbons are from American Crafts.  The circle tag can hold a sentiment or someone’s name.

IMG_20131201_122948

So I am more than half-way there for 12 days of Christmas treats!

Thanks so much for stopping by–I hope my creations sweetened your day!  Comment or email if you would like to know more about my techniques.  I love hearing from you and connecting!

Now I think it’s time for a few sweets myself–Almond Roca, anyone?  While you are indulging, head over to Nichole’s blog for some serious eye-candy!